While it's possible that you'll be successful running Golem and this tutorial on other platforms, we officially support the following:
OS X 10.14+
Ubuntu 18.04 or 20.04
Windows
If you are JS developer, please switch to NodeJS tab
To verify your currently installed version of python, please run:
python3 --version
If you have an older version of python and you'd like to keep that version in your system, consider using pyenv. You can use pyenv-installer to facilitate the process.
On Windows, you may need to just use python
instead of python3
Please bear in mind that our JS/TS API is an early alpha release and not nearly as refined as the Python one.
To verify your currently installed version of node, please run:
node --version
If you have an older version of node and you'd like to keep that version in your system, consider using nvm. You can install it using the instructions from:
​https://github.com/nvm-sh/nvm#install--update-script (Linux/macOS X)
Once you have nvm
installed on your machine, run:
nvm install v12
Yarn 1.22.3+
Verify that with:
yarn --version
If you don't have yarn
or need to update, it, please go to: https://classic.yarnpkg.com/en/docs/install/ and choose the version appropriate for your operating system.
You'll also need the git
versioning system client so you can clone our repositories. Ensure you have it available with:
git --version
Alpha lives on the Rinkeby Testnet. You don't need any real ETH or GLM tokens to start this tutorial. You also don't need to do anything to get test tokens! These test assets are acquired by the daemon in one of the steps below.
If you'd like to give us feedback, suggestions, have some errors to report or if you got stuck and need help while following our tutorials, please don't hesitate to reach out to us on our Golem Discord: https://chat.golem.network​
Yagna is the main service of the new Golem that's responsible for keeping connections with all the other nodes in the network.
In order to follow our requestor agent tutorial, you'll first need to run the yagna
daemon.
You can install it using our helper script like this:
curl -sSf https://join.golem.network/as-requestor | bash -
You might be asked to modify your PATH afterwards.
On Windows, only the manual installation is supported.
Alternatively, if you'd like to have more control over the installation process, or would like to choose where the binaries end up, you can do that manually.
First, download the requestor package - prefixed golem-requestor
- appropriate for your platform from: https://github.com/golemfactory/yagna/releases/tag/v0.5.0​
Unpack it and put the binaries contained within somewhere in your PATH
(e.g. copy them to /usr/local/bin
on unix-like systems) or add the directory you placed the binaries in to your PATH
.
It's important for the yagna
and gftp
binaries to be available in your shell's PATH, otherwise, you'll encounter issues while continuing the tutorial.
Once binaries are installed, confirm that you're running the latest Golem release:
yagna --version
It should output: yagna 0.5.0 (d33058bb 2020-12-01 build #96)
If you had run a previous version of yagna
in the past, you'll need to purge its working directories since our newest version is incompatible with the old database structure:
rm -rf $HOME/.local/share/yagna
rm -rf $HOME/Library/Application\ Support/GolemFactory.yagna
rmdir /s %APPDATA%\GolemFactory\yagna
Now, you can run the daemon:
yagna service run
Important: After you launch the daemon, leave it running in the background while you proceed with the tutorial.
You can now proceed to Generate the app key.
You may notice errors while running the yagna daemon or the example script. Some of those errors will be silenced, prevented or handled more gracefully in the future production version. For now, you can usually ignore them, unless of course, they make the daemon or the example script crash - or - cause the task itself to fail before completion.
Some of the errors you may encounter are:
[2020-08-11T10:49:17Z ERROR ya_service_bus::remote_router] bind error: already registered: Service ID [... url ... ] already registered
Task exception was never retrieved [... several lines of stack trace ...] {"message":"GSB error: bad request: No service registered under given address"}
With the daemon running, enter the daemon's directory using another shell and generate the yagna
app key that will be used by your requestor agent to access yagna's REST API.
yagna app-key create requestor
This should produce a 32-character-long hexadecimal app key that you need to note down as it will be needed to run the requestor agent.
In case you lose your app key, you can retrieve it with:
yagna app-key list
the value in the key
column is the key you need.
You need the following command to enable the daemon as a requestor.
What it also does under the hood, it also checks for funds on your requestor node and if needed, contacts the faucet which issues some nGNT tokens to the node using zkSync.
It needs to be run each time the daemon is started or restarted.
yagna payment init -r
Once you issue the command, allow some time until it completes its job.
You can verify whether you already have the funds with:
yagna payment status
If, after a few minutes, you can't see the assets, re-run the payment init
command above and check again after a few more minutes.
As the last resort, if you suspect that there is a more serious issue with the zkSync payment driver, you may wish to completely do away with using it and fall back to the older, on-chain payment driver. In such case, please refer to instructions in our troubleshooting section.
Now you have the yagna
daemon running, you may proceed with running a task as a requestor.
Ensure you're running python >= 3.6 and you have the venv
module installed (it's normally included in the python distribution).
Prepare a virtual environment for the tutorial script:
python3 -m venv ~/.envs/yagna-python-tutorialsource ~/.envs/yagna-python-tutorial/bin/activate
On Windows, you need to replace the above with:
python -m venv %HOMEDRIVE%%HOMEPATH%\.envs\yagna-python-tutorial%HOMEDRIVE%%HOMEPATH%\.envs\yagna-python-tutorial\Scripts\activate.bat
Install the dependencies:
pip3 install -U pippip3 install yapapi
Check out or download the yapapi
repository:
git clone https://github.com/golemfactory/yapapi.git
and make sure you're working on the version corresponding with the latest release:
cd yapapigit checkout b0.4
In order for the requestor agent to connect with the yagna daemon, you need to provide it with the previously-generated app key. You do that by setting the appropriate environment variable to a value acquired in the "Generate the app key" step above:
export YAGNA_APPKEY=insert-your-32-char-app-key-here
On Windows, please replace the above with:
set YAGNA_APPKEY=your-32-char-app-key
The example we're showcasing here resides in the examples/blender
directory within yapapi
's codebase so, ensure that you're in the checked-out repository's directory and run:
cd examples/blenderpython3 blender.py
Once you launch the example, you should see some messages reflecting the progress of your task's execution - agreement confirmations, task dispatches and finally task completions.
The example in question generates six discrete jobs for providers to execute so after those six activities are completed and results returned, the whole task is finished.
If everything goes right, after what could be anything from half-a-minute to a few minutes, you'll hopefully see the message announcing the successful completion of your assignment including a short summary of what had happened during the execution, which providers took part in the execution and the accumulated GNT cost of the whole task, e.g.:
Computation finished in 77.5s
Negotiated 1 agreements with 1 providers
Provider 'odra' computed 6 tasks
Total cost: 0.218290307253
Check out or download the yajsapi
repository:
git clone https://github.com/golemfactory/yajsapi.gitcd yajsapigit checkout b0.2
In order for the requestor agent to connect with the yagna daemon, you need to provide it with the previously-generated app key. You do that by setting the appropriate environment variable to a value acquired in the "Generate the app key" step above:
export YAGNA_APPKEY=insert-your-32-char-app-key-here
On Windows, please replace the above with:
set YAGNA_APPKEY=your-32-char-app-key
The example we're showcasing here resides in the examples/blender
directory within yajsapi
's codebase so, ensure that you're in the checked-out repository's directory and run:
cd examplesyarnyarn js:blender
If everything works as expected, you should see some messages that confirm agreements being struck between your requestor node and the providers in our testnet and then ones that announce work dispatched to providers with lines starting with Task sent to provider [...]
and subsequently confirmations of task completions.
To see some more detailed messages, you can run the example with yarn js:blender -d
.
The example in question generates six discrete jobs for providers to execute so after those six activities are completed and results returned, the whole task is finished.
Yay! With this, you have completed your first job as a requestor in the new Golem network!
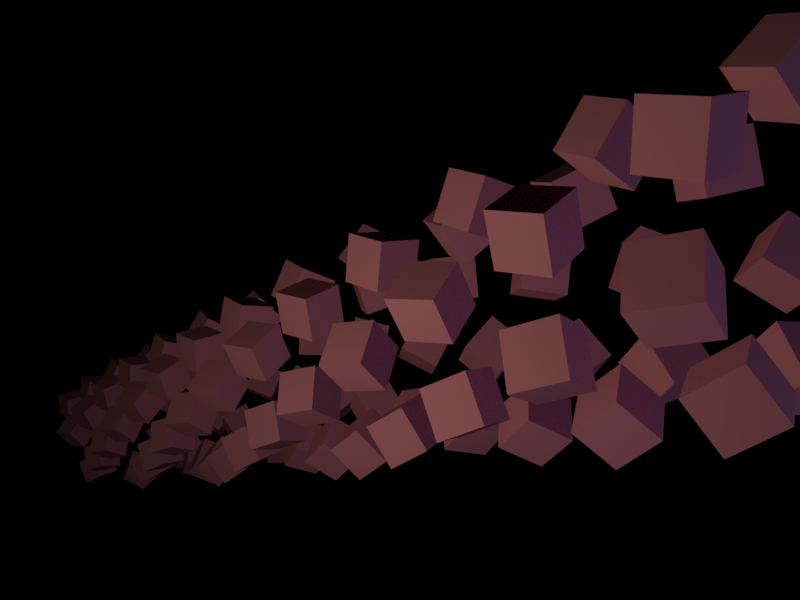
You can verify that the task is indeed done by examining the generated output files which are PNG
images with the selected frames of the rendered animation that should appear in the directory from which you ran the example script (examples/blender
within the cloned repository's path if you followed the tutorial precisely) .
Here is an example rendered frame, provided here for reference:
Finally, you can verify that the providers have been paid for the work they contributed to get that output to you. First, acquire your Ethereum address - you can do that by running:
yagna app-key list
again but this time it's the value in the id
column that you're interested in. This is your the Ethereum address of your yagna node on the Rinkeby testnet and on zkSync. Once you have that address, head to https://rinkeby.zkscan.io/ , put the value in the address field there and verify that you see the outgoing payment transactions.
So, you have successfully completed your first task as a requestor on the new Golem network. Are you curious to learn more? Wanna do more stuff?
If you'd like to understand, extend and play around with our example, please consult:
On the other hand, if you'd like to deploy your own dockerized apps to our alpha testnet, have a look at: