JS Task API Examples: transferring data
Introduction
In this article, we will present methods that let you send files to and from a provider as well as send JSON to a remote computer.
Look at the table below to check what particular methods are available in each environment.
The following commands are currently available:
| Command | Available in node.js | Available in web browser |
|---|---|---|
run() | yes | yes |
uploadFile() | yes | no |
uploadJson() | yes | yes |
downloadFile() | yes | no |
uploadData() | yes | yes |
downloadData() | no | yes |
downloadJson() | no | yes |
Prerequisites
Yagna service is installed and running with the try_golem app-key configured.
How to run examples
Create a project folder, initialize a Node.js project, and install the @golem-sdk/task-executor library.
mkdir golem-example
cd golem-example
npm init
npm i @golem-sdk/task-executor
To run the examples provided below, copy the code supplied there into the index.mjs file in the project folder and run:
node index.mjsUploading a file to the provider
In this example, we calculate the md5 hash of the example script worker.mjs, send it to a remote computer, and calculate the md5 hash of the file in the remote location. Finally, we print both values for comparison.
This example requires a simple worker.mjs script that can be created with the following command:
echo console.log("Hello Golem World!"); > worker.mjsimport { TaskExecutor, pinoPrettyLogger } from "@golem-sdk/task-executor";
import { createHash } from "node:crypto";
import * as fs from "fs";
(async () => {
const executor = await TaskExecutor.create({
package: "golem/node:20-alpine",
logger: pinoPrettyLogger(),
yagnaOptions: { apiKey: "try_golem" },
});
const buff = fs.readFileSync("worker.mjs");
const hash = createHash("md5").update(buff).digest("hex");
try {
const result = await executor.run(async (ctx) => {
await ctx.uploadFile("./worker.mjs", "/golem/input/worker.mjs");
const res = await ctx.run(
`node -e "const crypto = require('node:crypto'); const fs = require('fs'); const buff = fs.readFileSync('/golem/input/worker.mjs'); const hash = crypto.createHash('md5').update(buff).digest('hex'); console.log(hash);"`,
);
return res.stdout;
});
console.log("md5 of the file sent to provider: ", result);
console.log("Locally computed md5: ", hash);
} catch (error) {
console.error("Computation failed:", error);
} finally {
await executor.shutdown();
}
})();

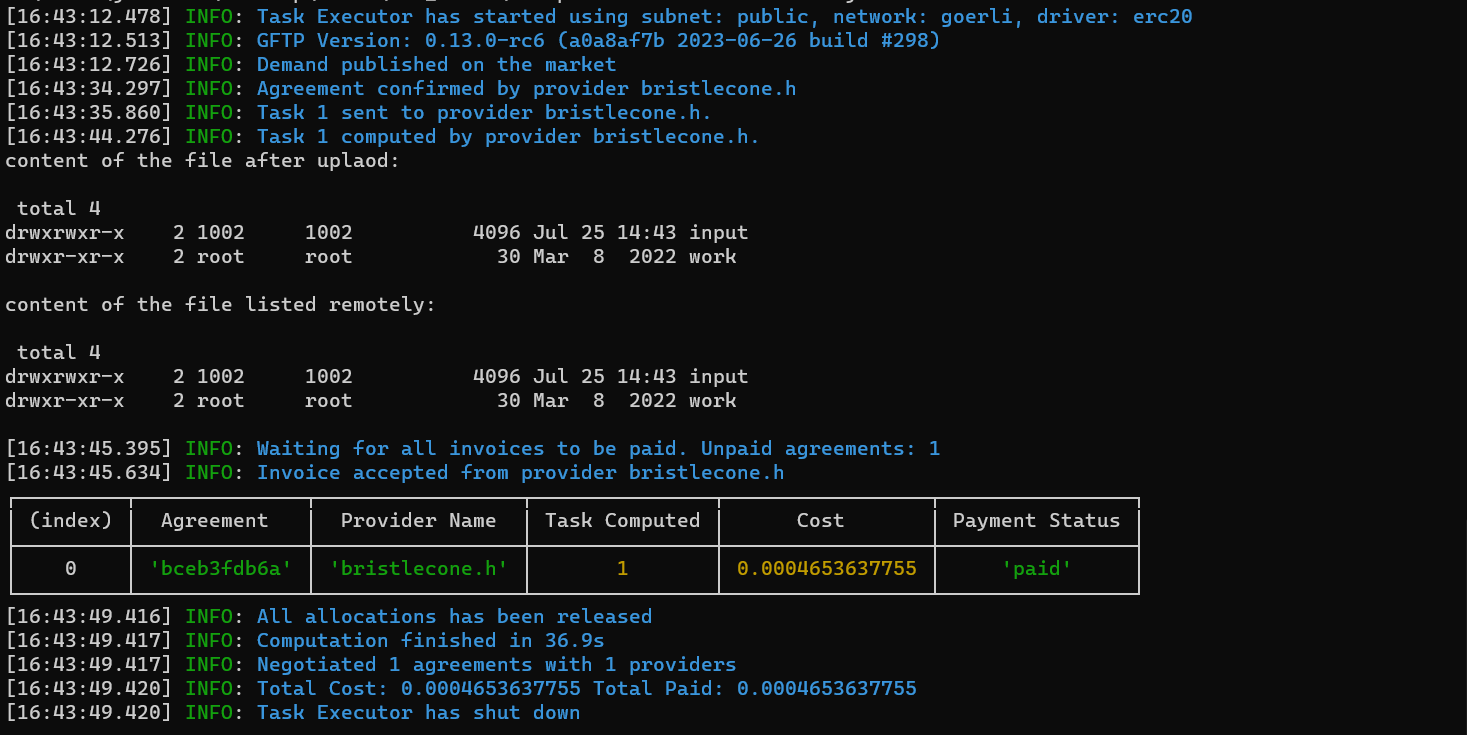
Downloading a file from the provider
In this example, we create a file on a remote computer, list its content to a result object, and finally download it to compare its content with the result obtained remotely.
import { TaskExecutor, pinoPrettyLogger } from "@golem-sdk/task-executor";

(async () => {
  const executor = await TaskExecutor.create({
    package: "golem/alpine:latest",
    logger: pinoPrettyLogger(),
    yagnaOptions: { apiKey: "try_golem" },
  });

  try {
    const result = await executor.run(async (ctx) => {
      const res = await ctx
        .beginBatch()
        .run("ls -l /golem > /golem/work/output.txt")
        .run("cat /golem/work/output.txt")
        .downloadFile("/golem/work/output.txt", "./output.txt")
        .end();

      return res[2]?.stdout;
    });

    console.log(result);
  } catch (error) {
    console.error(error);
  } finally {
    await executor.shutdown();
  }
})();
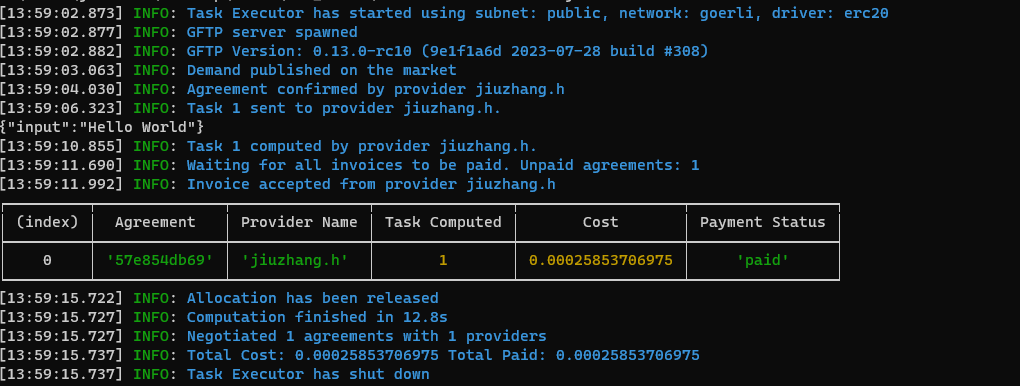
Uploading JSON to provider
import { TaskExecutor, pinoPrettyLogger } from "@golem-sdk/task-executor";

(async () => {
  const executor = await TaskExecutor.create({
    package: "golem/alpine:latest",
    logger: pinoPrettyLogger(),
    yagnaOptions: { apiKey: "try_golem" },
  });

  try {
    const output = await executor.run(async (ctx) => {
      // Upload test JSON object
      await ctx.uploadJson({ input: "Hello World" }, "/golem/work/input.json");

      // Read the content of the JSON object.
      return await ctx.run("cat /golem/work/input.json");
    });
    console.log(output.stdout);
  } catch (error) {
    console.error("Computation failed:", error);
  } finally {
    await executor.shutdown();
  }
})();
Uploading data to and from the provider (in a browser)
In this example, we demonstrate how to use the uploadData() and downloadData() methods that allow you to send and receive data when you run your requestor script from a browser. The code below realizes the following job: let the user select an image file and a text, then send it to the provider where it utilizes ImageMagick to combine the image and text to create a meme. The result is displayed in the browser window.
The example utilizes a basic HTML boilerplate that defines UI components:
- a form to select the background image for the meme and user text.
- the
Generate memebutton to trigger the task - the result frame where the output meme will be displayed
- log section - where the logs are displayed.
To run this example you must use Yagna version 0.13 or higher and run it using the --api-allow-origin parameter. The example code should be saved as the index.html file and served by i.e. http-server. See Web Quickstart for instructions.
<!doctype html>
<html lang="en">
  <head>
    <meta charset="UTF-8" />
    <title>WebRequestor Task API</title>
  </head>
  <body>
    <h1>WebRequestor - Meme Example</h1>
    <div class="container">
      <div class="col-6">
        <h3>Options</h3>
        <div class="column">
          <div>
            <label for="YAGNA_API_BASEPATH">Yagna Api BaseUrl: </label>
            <input id="YAGNA_API_BASEPATH" type="text" value="http://127.0.0.1:7465" />
          </div>
          <div>
            <label for="SUBNET_TAG">Subnet Tag: </label>
            <input id="SUBNET_TAG" type="text" value="public" />
          </div>
          <div>
            <label for="PAYMENT_NETWORK">Payment network: </label>
            <input id="PAYMENT_NETWORK" type="text" value="holesky" />
          </div>
        </div>
        <h3>Input data</h3>
        <div class="column">
          <div>
            <label for="MEME_TEXT">Meme Text: </label>
            <input id="MEME_TEXT" type="text" value="some meme text" />
          </div>
          <div>
            <label for="MEME_IMG">Meme Image: </label>
            <input type="file" id="MEME_IMG" accept="image/*" />
          </div>
        </div>
        <h3>Actions</h3>
        <div class="row vertical">
          <div>
            <button id="RUN">Generate meme</button>
          </div>
        </div>
        <div class="results console">
          <h3>Result Meme</h3>
          <img style="width: 100%" alt="" id="RESULT_MEME" />
        </div>
      </div>
      <div class="col-6 border-left">
        <div class="logs console">
          <h3>Logs</h3>
          <ul id="logs"></ul>
        </div>
      </div>
    </div>

    <script type="module">
      import { TaskExecutor } from "https://unpkg.com/@golem-sdk/task-executor";

      let activity;
      const imgInput = document.getElementById("MEME_IMG");
      const textInput = document.getElementById("MEME_TEXT");
      const imgResult = document.getElementById("RESULT_MEME");
      let urlObject;

      function readFile(file) {
        return new Promise((resolve, reject) => {
          const fileReader = new FileReader();
          fileReader.readAsArrayBuffer(file);

          fileReader.onload = () => {
            resolve(new Uint8Array(fileReader.result));
          };

          fileReader.onerror = (error) => {
            reject(error);
          };
        });
      }

      function appendLog(msg) {
        const logs_el = document.getElementById("logs");
        const li = document.createElement("li");
        li.appendChild(document.createTextNode(msg));
        logs_el.appendChild(li);
      }
      function setResponse(result) {
        if (urlObject) {
          URL.revokeObjectURL(urlObject);
        }
        urlObject = URL.createObjectURL(new Blob([result], { type: "image/jpeg" }));
        imgResult.src = urlObject;
      }

      const logger = {
        warn: (msg) => appendLog(`[${new Date().toISOString()}] [warn] ${msg}`),
        debug: (msg) => appendLog(`[${new Date().toISOString()}] [debug] ${msg}`),
        error: (msg) => appendLog(`[${new Date().toISOString()}] [error] ${msg}`),
        info: (msg) => appendLog(`[${new Date().toISOString()}] [info] ${msg}`),
        child: () => logger,
      };

      async function run() {
        if (!imgInput.files.length) {
          alert("Please select an image file");
          return;
        }

        const fileData = await readFile(imgInput.files[0]);
        const extension = imgInput.files[0].name.split(".").pop();
        const inputImage = `/golem/input/input.${extension}`;
        const outputImage = `/golem/output/output.jpeg`;
        const text = textInput.value.replace(/'/g, `'\\''`);

        const executor = await TaskExecutor.create({
          package: "golem/imagemagick:latest",
          yagnaOptions: { apiKey: "try_golem", basePath: document.getElementById("YAGNA_API_BASEPATH").value },
          subnetTag: document.getElementById("SUBNET_TAG").value,
          payment: { network: document.getElementById("PAYMENT_NETWORK").value },
          logger,
        });

        const result = await executor
          .run(async (ctx) => {
            await ctx.uploadData(fileData, inputImage);
            await ctx.run(
              `convert ${inputImage} -background Khaki -pointsize 50 label:'${text}' -gravity Center -append ${outputImage}`,
            );
            return await ctx.downloadData(outputImage);
          })
          .catch((e) => logger.error(e));

        await executor.shutdown();
        if (result?.data) setResponse(result.data);
      }
      document.getElementById("RUN").onclick = run;
    </script>
  </body>
</html>
The .uploadData(fileData, inputImage) method is used to copy the user-provided data to the location defined by inputImage. The file is read from a disk by the readFile() function.
The .downloadData(outputImage) method downloads the data which is accessible in the data attribute of the respective result object. The setResponse() function is used to update the src attribute of the dom element devised to display the output.
Other functions are explained in the Web Quickstart article.
Uploading JSON to and from the provider (in a browser)
In this example, we demonstrate how to use the uploadJson() and downloadJson() methods that allow you to send and receive JSON data when you run your requestor script from a browser. The code below realizes the following job: let the user define the JSON object { "input": "Hello World" }, then send it to the provider. On the remote computer, JSON is saved as /golem/work/input.json. Next the attribute input is replaced into output with sed command and saved as /golem/work/output.json. Finally, the file is downloaded with the downloadJson() method. The output of the command contains the JSON as data attribute.
The example utilizes a basic HTML boilerplate that defines UI components:
- the
Runbutton to trigger the task - the result frame where the content of output attribute of the JSON will be displayed
- log section - where the logs are displayed.
To run this example you must use Yagna version 0.13 or higher and run it using the --api-allow-origin parameter. See Web Quickstart for instructions.
<!doctype html>
<html lang="en">
  <head>
    <meta charset="UTF-8" />
    <title>Golem JSON App</title>
    <script type="module">
      import { TaskExecutor } from "https://unpkg.com/@golem-sdk/task-executor";

      function appendResults(result) {
        const results = document.getElementById("results");
        const div = document.createElement("div");
        div.appendChild(document.createTextNode(result));
        results.appendChild(div);
      }
      function appendLog(msg, level = "info") {
        const logs = document.getElementById("logs");
        const div = document.createElement("div");
        div.appendChild(document.createTextNode(`[${new Date().toISOString()}] [${level}] ${msg}`));
        logs.appendChild(div);
      }
      const logger = {
        warn: (msg) => appendLog(msg, "warn"),
        debug: (msg) => 0, //appendLog(msg, 'debug'),
        error: (msg) => appendLog(msg, "error"),
        info: (msg) => appendLog(msg, "info"),
        child: () => logger,
      };
      async function run() {
        const executor = await TaskExecutor.create({
          package: "golem/alpine:latest",
          yagnaOptions: { apiKey: "try_golem", basePath: document.getElementById("YAGNA_API_BASEPATH").value },
          subnetTag: document.getElementById("SUBNET_TAG").value,
          payment: { network: document.getElementById("PAYMENT_NETWORK").value },
          logger,
        }).catch((e) => logger.error(e));

        await executor
          .run(async (ctx) => {
            // Upload test JSON object
            await ctx.uploadJson({ input: "Hello World" }, "/golem/work/input.json");
            // Modify sent JSON to replace the input key with output
            await ctx.run("cat /golem/work/input.json | sed s/input/output/ > /golem/work/output.json");
            // Download the JSON object.
            const output = await ctx.downloadJson("/golem/work/output.json");
            appendResults(JSON.stringify(output.data.output, null, "\t"));
          })
          .catch((e) => logger.error(e));
        await executor.shutdown();
      }
      document.getElementById("echo").onclick = run;
    </script>
  </head>
  <body>
    <h1>JSON upload and download</h1>
    <div class="container">
      <div class="col-6">
        <h3>Options</h3>
        <div class="column">
          <div>
            <label for="YAGNA_API_BASEPATH">Yagna Api BaseUrl: </label>
            <input id="YAGNA_API_BASEPATH" type="text" value="http://127.0.0.1:7465" />
          </div>
          <div>
            <label for="SUBNET_TAG">Subnet Tag: </label>
            <input id="SUBNET_TAG" type="text" value="public" />
          </div>
          <div>
            <label for="PAYMENT_NETWORK">Payment network: </label>
            <input id="PAYMENT_NETWORK" type="text" value="holesky" />
          </div>
        </div>
        <h3>Actions</h3>
        <div class="row vertical">
          <div>
            <button id="echo">Run</button>
          </div>
        </div>
        <div class="results console">
          <h3>Results</h3>
          <ul id="results"></ul>
        </div>
      </div>
      <div class="col-6 border-left">
        <div class="logs console">
          <h3>Logs</h3>
          <ul id="logs"></ul>
        </div>
      </div>
    </div>
  </body>
</html>
All other functions are explained in the Web Quickstart article.
Was this helpful?