Executing tasks in parallel - tutorial
Introduction
This tutorial will lead you through the steps required to execute tasks in parallel on the Golem Network.
We will go through the following steps:
- Define the problem and split it into chunks that can be executed in parallel
- Create a Golem image
- Create a requestor script
- Run the tasks in parallel and process the output
Prerequisites
- Yagna service is installed and running with the
try_golemapp-key configured (instructions). - Docker installed and Docker service available.
Define the problem
As a practical example of a problem that is suitable for parallel processing, we selected the task of recovering passwords using the hashcat tool. You can apply a similar procedure to utilize Golem Network for other problems that require parallel processing.
Let's assume we have a password hash obtained from an unknown password processed using the "phpass" algorithm. (Phpass is used as a hashing method by popular web frameworks such as WordPress and Drupal) and we know a password mask ?a?a?a (this means the password consists of three alphanumeric characters).
Our objective is to recover the password using Hashcat - a command-line utility that cracks unknown passwords from their known hashes. Hashcat supports 320 hashing algorithms and 5 different attack types, but for this example, we`ll use only the "phpass" algorithm and a simple brute-force attack.
To find the password that matches the given hash and mask, we could run the following command:
hashcat -a 3 -m 400 in.hash ?a?a?awhere
-a 3specifies a brute-force attack,-m 400specifies thephpassalgorithm,in.hashis the name of the file that contains the hashed password (for our examples we will use:$P$5ZDzPE45CLLhEx/72qt3NehVzwN2Ry/) and?a?a?ais the mask to use.
As a result of the above command, the file hashcat.pot file would be created with the following content: $P$5ZDzPE45CLLhEx/72qt3NehVzwN2Ry/:pas. The output consists of the original hash and the recovered password pas after :.
To speed up the process we can split the keyspace of the potential solution into smaller subsets and run the tasks in parallel.
To achieve this we need to determine the size of the keyspace for a given mask and algorithm:
hashcat --keyspace -a 3 ?a?a?a -m 400The keyspace for this case is 9025 which could be split into 3 segments with the following boundaries:
- 0..3008
- 3009..6017
- 6018..9025
Once we have the segment limits defined we can use --skip and --limit options in the hashcat command:
hashcat -a 3 -m 400 in.hash --skip 3009 --limit 6016 ?a?a?aThe above command will process the 3009..6016 fragment, and any results in that range will be written to the hashcat.pot file.
For more information on hashcat arguments, see the complete reference
Setting up the project
Create a project folder and open it.
mkdir parallel-example
cd parallel-example
Preparing Image
You can skip this section if you do not have Docker installed and use the image hash provided in the example.
The tasks that we send to the remote computer are executed in the context of the specified software package - the image. When we create the Task Executor we provide the hash of the image that will be used during processing. In the Quickstart example, we used an image that contained Node.js.
In our case, we need to prepare a custom image containing hashcat software that we will use on the provider’s machines. Golem images are converted from Docker images, so we can start with any existing Docker image that meets your needs and modify it to create a custom one. For our task, we will use an off-the-shelf hashcat image (dizcza/docker-hashcat:intel-cpu) and modify it slightly for Golem.
Dockerfile
Create a Dockerfile file with the following content:
FROM ubuntu
WORKDIR /golem/work
RUN apt update
RUN apt install -y hashcat
We use dizcza/docker-hashcat:intel-cpu Docker image as starting point, and then we define a working directory - WORKDIR /golem/entrypoint.
Docker image
To build the Docker image, use the following commands:
docker build . -t hashcatConversion to the Golem image
If you have not installed it yet, install the Golem image conversion tool (gvmkit-build):
npm install -g @golem-sdk/gvmkit-buildthen convert the Docker image into Golem format
gvmkit-build hashcatand upload the image anonymously to the repository.
gvmkit-build --direct-file-upload hashcat.gvmi --push --nologinThis command will produce the hash of the image that you can use in the example.
....
-- image link (for use in SDK):
....Note that the lifetime of images uploaded anonymously to the repository is limited, and they can be removed from the registry portal after some time without notice.
The details of docker image conversion are described here: Converting an image from Docker to Golem GVMI
The requestor script code
Our algorithm
Based on the usage of the hashcat tool, our algorithm will be straightforward:
- First we will calculate the keyspace, then
- Split it into several segments and run tasks in parallel on many providers, as defined by the user.
- Finally, we will collect the results and provide the user with the output.
Note, we could calculate the keyspace locally, but in this example we will also do it on a remote computer, avoiding installing hashcat on our computer.
JS project setup
Now initialize the project, and install the @golem-sdk/task-executor library.
npm init
npm install @golem-sdk/task-executor
Create the index.mjs file with the following content:
import { TaskExecutor } from '@golem-sdk/task-executor'
import { program } from 'commander'

async function main(args) {
  console.log(args)

  // todo: Create Executor
  // todo: Calculate keyspace
  // todo: Calculate boundaries for each chunk
  // todo: Run the task on multiple providers in parallel
  // todo: Process and print results
  // todo: End executor
}

program
  .option(
    '--number-of-providers <number_of_providers>',
    'number of providers',
    (value) => parseInt(value),
    3
  )
  .option('--mask <mask>')
  .requiredOption('--hash <hash>')

program.parse()

const options = program.opts()

main(options).catch((e) => console.error(e))
We use the commander library to pass arguments such as --mask and --max-workers. This library will print a nice argument description and an example invocation when we run the requestor script with --help. Note you need to install it with npm install commander.
The main function contains the body of the requestor application. Its sole argument, args, contains information on the command-line arguments read by the argument parser.
We do not run anything on Golem yet.
TaskExecutor and package definition
To execute our tasks on the Golem Network, we need to create a TaskExecutor instance.
const executor = await TaskExecutor.create({
  package: '055911c811e56da4d75ffc928361a78ed13077933ffa8320fb1ec2db',
  maxParallelTasks: args.numberOfProviders,
  yagnaOptions: { apiKey: `try_golem` },
})
The package parameter is required and points to the image that we want the containers to run. We use the hash of the image created by us, but you can use the hash received from gvmkit-build when you created your image.
The other parameters are: maxParallelTasks: the maximum number of tasks we want to run in parallel yagnaOptions: { apiKey: 'try_golem' } - the api key that links your script to identity on the network.
Running a single task on the network to calculate the keyspace
The first step in the computation is to check the keyspace size. For this, we only need to execute hashcat with --keyspace and read the commands' output. With the TaskExecutor instance running, we can now send such a task to one of the providers using the run method:
const keyspace = await executor.run(async (ctx) => {
  const result = await ctx.run(`hashcat --keyspace -a 3 ${args.mask} -m 400`)
  return parseInt(result.stdout || '')
})

if (!keyspace) throw new Error(`Cannot calculate keyspace`)
console.log(`Keyspace size computed. Keyspace size = ${keyspace}.`)
This call tells the executor to execute a single task defined by the task function async (ctx) => {}. The ctx object allows us to run a task consisting of a single or batch of commands on the provider side. The keyspace size can be obtained from the stdout attribute of the result object returned by the task function. In case we cannot calculate the size of the keyspace we will throw an error.
Calculate boundaries for chunks
As we will run hashcat on a fragment of the whole keyspace, using the --skip and --limit parameters, we need to split the keyspace into chunks. Knowing the keyspace size and maximum number of providers we range for each of the tasks:
const step = Math.floor(keyspace / args.numberOfProviders + 1)
const range = [...Array(Math.floor(keyspace / step) + 1).keys()].map(
  (i) => i * step
)
Note that the number of chunks does not determine the number of engaged providers. In this example, we decided to split the job into 3 tasks, but the number of providers we want to engage is determined by the maxParallelTasks parameter. The executor will try to engage that number of providers and then pass the tasks to them. Once a provider is ready to execute a task, it takes up the next task from a common pool of tasks. As such, a fast provider may end up executing more tasks than a slow one.
Running many tasks on multiple providers
Next, we can start looking for the password using multiple workers, executing the tasks on multiple providers simultaneously.
For each worker, we perform the following steps:
- Execute hashcat with proper --skip and --limit values on the provider.
- Get the hashcat_{skip}.potfile from the provider to the requestor.
- Parse the result from the .potfile.
Let's first create a function that will look for the password in a given range of the keyspace.
const findPasswordInRange = async (skip) => {
  const password = await executor.run(async (ctx) => {
    const [, potfileResult] = await ctx
      .beginBatch()
      .run(
        `hashcat -a 3 -m 400 '${args.hash}' '${
          args.mask
        }' --skip=${skip} --limit=${skip + step} -o pass.potfile || true`
      )
      .run('cat pass.potfile || true')
      .end()
    if (!potfileResult.stdout) return false
    // potfile format is: hash:password
    return potfileResult.stdout.toString().trim().split(':')[1]
  })
  if (!password) {
    throw new Error(`Cannot find password in range ${skip} - ${skip + step}`)
  }
  return password
}
Note, that we use the beginBatch() method to organize together two sequential commands: the first will run the hashcat and the second will print the content of the output file. As we conclude the batch with the end() method the task function will return an array of results objects. As the cat pass.potfile is run as a second command its result will be at index 1 so we can use array destructuring to grab only that result. Keep in mind that tasks executed on a single worker instance run within the same virtual machine and share the contents of a VOLUME. It means that files in the VOLUME left over from one task execution will be present in a subsequent run as long as the execution takes place on the same provider and thus, the same file system.
Processing the results
Let's run our function for each of the ranges. We only need to wait for the first successful result so we can use the Promise.any method.
try {
  const password = await Promise.any(range.map(findPasswordInRange))
  console.log(`Password found: ${password}`)
} catch (err) {
  console.log(`Password not found`)
} finally {
  await executor.shutdown()
}
Once we get the password we print it in the console and end executor.
The complete example
import { TaskExecutor, pinoPrettyLogger } from "@golem-sdk/task-executor";
import { program } from "commander";

async function main(args) {
  const executor = await TaskExecutor.create({
    package: "055911c811e56da4d75ffc928361a78ed13077933ffa8320fb1ec2db",
    maxParallelTasks: args.numberOfProviders,
    logger: pinoPrettyLogger(),
    yagnaOptions: { apiKey: `try_golem` },
  });

  const keyspace = await executor.run(async (ctx) => {
    const result = await ctx.run(`hashcat --keyspace -a 3 ${args.mask} -m 400`);
    return parseInt(result.stdout || "");
  });

  if (!keyspace) throw new Error(`Cannot calculate keyspace`);

  console.log(`Keyspace size computed. Keyspace size = ${keyspace}.`);
  const step = Math.floor(keyspace / args.numberOfProviders + 1);
  const range = [...Array(Math.floor(keyspace / step) + 1).keys()].map((i) => i * step);

  const findPasswordInRange = async (skip) => {
    const password = await executor.run(async (ctx) => {
      const [, potfileResult] = await ctx
        .beginBatch()
        .run(
          `hashcat -a 3 -m 400 '${args.hash}' '${args.mask}' --skip=${skip} --limit=${
            skip + step
          } -o pass.potfile || true`,
        )
        .run("cat pass.potfile || true")
        .end();
      if (!potfileResult.stdout) return false;
      // potfile format is: hash:password
      return potfileResult.stdout.toString().trim().split(":")[1];
    });
    if (!password) {
      throw new Error(`Cannot find password in range ${skip} - ${skip + step}`);
    }
    return password;
  };

  try {
    const password = await Promise.any(range.map(findPasswordInRange));
    console.log(`Password found: ${password}`);
  } catch (err) {
    console.log(`Password not found`);
  } finally {
    await executor.shutdown();
  }
}

program
  .option("--number-of-providers <number_of_providers>", "number of providers", (value) => parseInt(value), 3)
  .option("--mask <mask>")
  .requiredOption("--hash <hash>");
program.parse();
const options = program.opts();
main(options).catch((error) => console.error(error));
To test our script, copy it into the index.mjs file. Ensure your Yagna service is running and run:
node index.mjs --mask '?a?a?a' --hash '$P$5ZDzPE45CLLhEx/72qt3NehVzwN2Ry/'You should see an output similar to the one below.
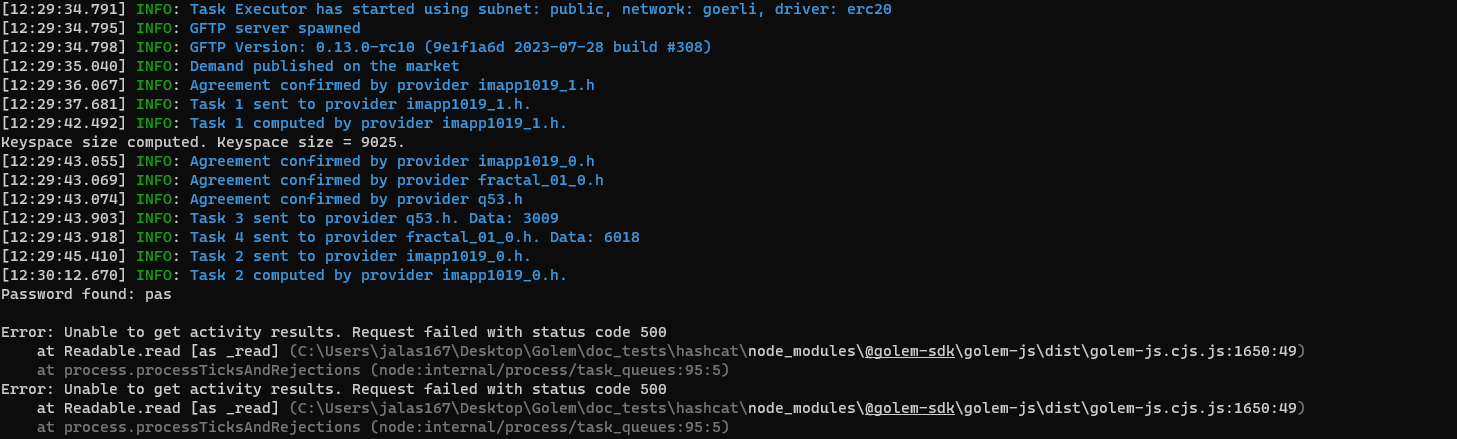
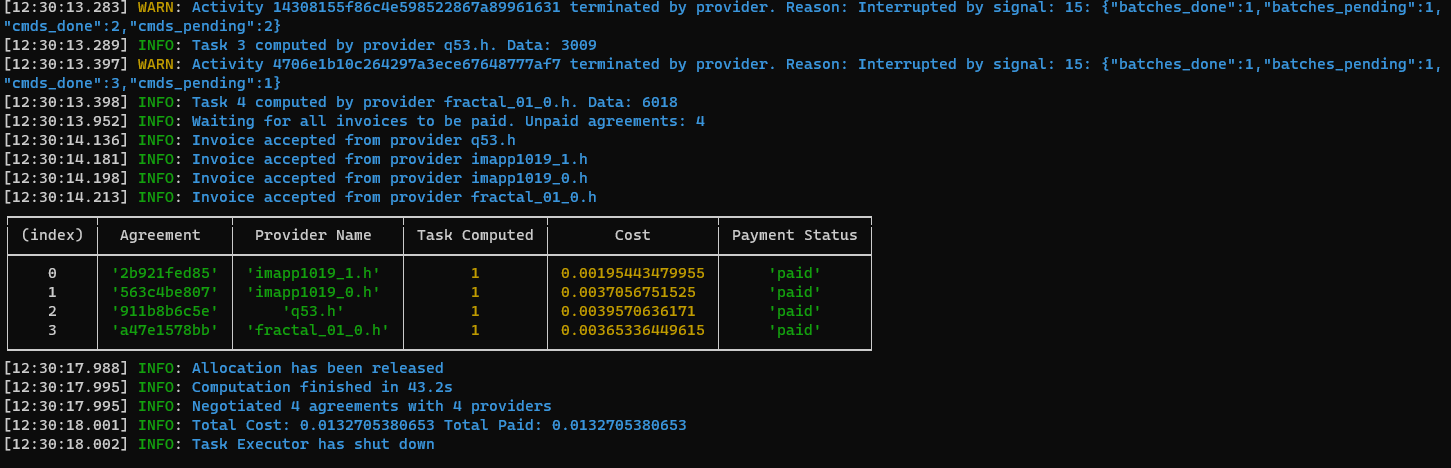
You can clone the @golem-sdk/task-executor repository and find the complete project in the examples/hashcat folder.
Summary
In this tutorial, we led you through the following steps:
- Custom Golem image creation
- Parallel task execution across multiple providers
- Submitting multiple command sequences as a single task
- Reading output from commands executed on a provider
- Other JS Tutorials
Was this helpful?