Introduction
This article will go through the process of creating a Dockerfile, building a Docker image, then converting it to a Golem image and using it in a requestor script.
Prerequisites:
- Docker. If you don't have Docker installed follow these instructions
- Gvmkit-build. (Installation instructions)
- Yagna running with
try_golemapp-key configured (see instructions)
Creating the Dockerfile
This is the simple Dockerfile we are going to use, using the Node base image, creating one volume, and setting the working directory. Simply create a file with the name Dockerfile, without any file extension, and paste the following contents:
FROM python:latest
WORKDIR /golem/work
VOLUME /golem/work
COPY Dockerfile /golem/info/description.txt
COPY Dockerfile /golem/work/info.txt
Note we copy the Dockerfile content into 2 different locations:
- to /golem/info (this folder is not defined as VOLUME)
- and to /golem/work (this folder is defined as VOLUME)
Building the Docker image
To build the Docker image from the Dockerfile, we can run the following command in the same directory (.) as the Dockerfile to build an image tagged python-example:
docker build -t python-example .The output should look like this:

Note that the image won't be turned into a file in the same directory. The location of the actual Docker image file depends on the Docker and your operating system version. Please consult the Docker manual for additional information.
Converting from Docker to Golem and uploading it to the registry
Now when you have a Docker image built, we can convert it to a Golem image. To save time, we will also upload it to the registry with the same command. To do this, you need to run the appropriate command that uses gvmkit-build to convert and push the image python-example to the registry.
If you do not have gvmkit-build installed, please follow the installation intructions. You can also use it without installation, by using pipx.
gvmkit-build python-example --push --nologinAfter running the command, you will see an output that looks like this:
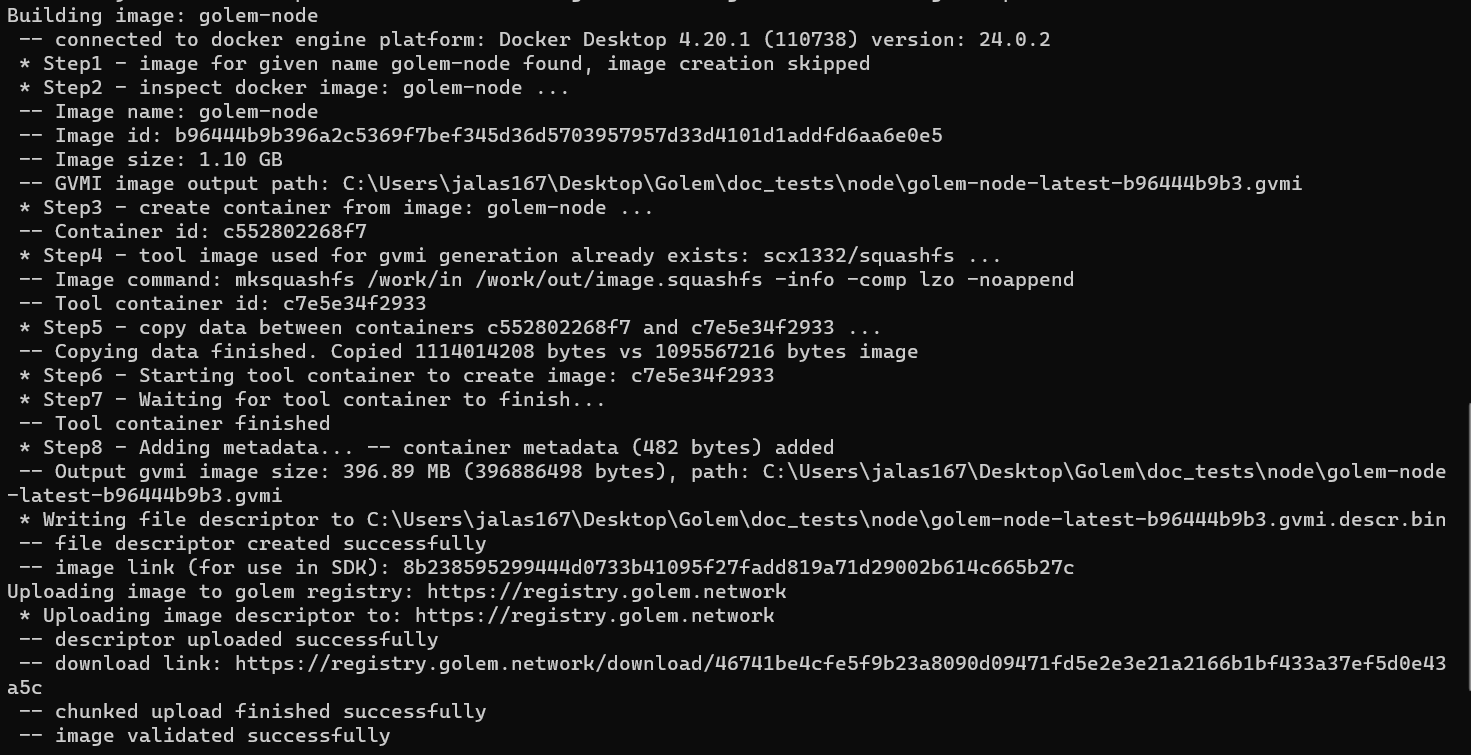
The hash is found after the image link, which in this case gives us the hash 7e31861bd912a201f363cb6bdddcc5a00e069cec1c3ecc5afee292bc. If you ever lose your hash, you can always recover/re-generate it by running the same command again.
Using the image in a requestor script
Let's use the newly created image in a requestor script and ensure this is the one we have just made.
We need to prepare our environment:
mkdir golem-example
cd golem-examplepython3 -m venv --clear ~/.envs/image-python-tutorial
source ~/.envs/image-python-tutorial/bin/activateInstall the dependencies:
pip install -U pip
pip install yapapi
We can now create our requestor.py requestor file, with the package: "7e31861bd912a201..." matching our image hash.
#!/usr/bin/env python3
import asyncio
from typing import AsyncIterable

from yapapi import Golem, Task, WorkContext
from yapapi.log import enable_default_logger
from yapapi.payload import vm


async def worker(context: WorkContext, tasks: AsyncIterable[Task]):
    async for task in tasks:
        script = context.new_script()
        outputs = list()
        outputs.append(script.run("/bin/sh", "-c", "cat /golem/info/description.txt"))
        outputs.append(script.run("/bin/sh", "-c", "ls -l /golem/work"))
        yield script

        task.accept_result(result=[(await output).stdout for output in outputs])


async def main():
    package = await vm.repo(
        image_hash="7e31861bd912a201f363cb6bdddcc5a00e069cec1c3ecc5afee292bc",
    )

    tasks = [Task(data=None)]

    async with Golem(budget=1.0, subnet_tag="public") as golem:
        async for completed in golem.execute_tasks(worker, tasks, payload=package):
            print(completed.result[0].strip(), "\n", completed.result[1].strip())


if __name__ == "__main__":
    enable_default_logger(log_file="hello.log")

    loop = asyncio.get_event_loop()
    t = loop.create_task(main())
    loop.run_until_complete(t)
In the script, we specify that our task should use the newly created image (indicated by hash: 7e31861bd912a201...). We run two commands. The first one prints the content of the decription.txt file (it is a copy of the Dockerfile used to create the image). The second command lists the content of the /golem/work folder. We copied some files there as well (check the content of the description.txt file), but as /golem/work is defined as VOLUME and created as new when VM is started, this folder will be empty.
Running the script
Setup the api key with the command:
export YAGNA_APPKEY=insert-your-32-char-app-key-hereRun the following command after ensuring the Yagna service is running and configured correctly:
python requestor.py
You have successfully created and used your Golem image in a requestor script!
Note that the content of the description.txt file that was created in the /golem/info folder is accessible, while the /golem/work folder is empty.
- Try your image in one of tutorials!
Was this helpful?